Explore SQL Server Contained Database
What is Contained Database ?
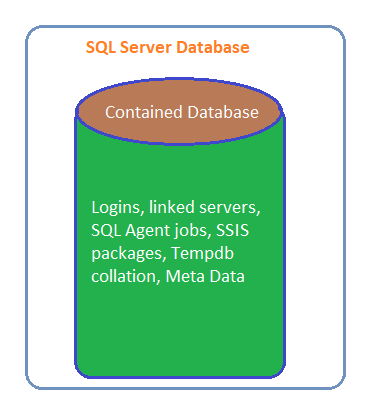
Contained database is a features that is isolated database from the SQL Server instance and other databases located in the same instance. It was introduced in all edition of SQL Server 2012 having few special features.
Key objectives of Contained database is to enable isolation and portability.It’s gives, database to seamless mobility (of a database) to move from one server to another.But how the mobility is ensured : having user data and other related metadata are kept into the contained database.Whether normal databases usages instance-level login which is stored in the master database.When it move to another database, there is no need to create logins on the instance level.This features are preferable for always on solution.
sys.dm_db_uncontained_entities DMV help to identify unconstrained entities that might prevent portability. Whenever containment status is known of database then determine what objects or features need to replace or alter to support containment.
Why contained database are Used :
Instance level logins, linked servers, SQL Agent jobs, SSIS packages, Tempdb collation, and even other databases often need to be manually copied and synchronized between instances when a database is being log shipped, mirrored, or part of an Availability Group.
The Database containment feature puts all of these items within the database itself. This way when you copy a database from one instance to another, you can be sure you moved everything. The end goal is to fully separate database management from application functions.
Authentication Migration :
This allows user authentication to be performed at the database level and reduces the dependency of the database on the SQL Server logins.As metadata is saved within the database, database migration can be easily performed without worrying about the migration of SQL Server logins.
Always On availability groups:
By reducing the ties to the instance of SQL Server, partially contained databases can be useful during fail over when you use Always On availability groups.Creating contained users enables the user to connect directly to the contained database. This is a very significant feature in high availability and disaster recovery scenarios such as in an Always On solution. If the users are contained users, in case of failover, people would be able to connect to the secondary without creating logins on the instance hosting the secondary. This provides an immediate benefit.
Avoid dependency on Master database :
In the contained database user model, the login in the master database is not present. Instead, the authentication process occurs at the user database, and the database user in the user database does not have an associated login in the master database.To connect as a contained database user, the connection string must always contain a parameter for the user database so that the Database Engine knows which database is responsible for managing the authentication process.
Manageability Enhancement:
Enabling database containment will allow each database owner to manage his/her own database, without having sysadmin permissions at the server level
Avoid the dependency of TempDB:
Temporary database objects will be created using the contained database collation rather than the TempDB collation.
Metadata & Server Setting:
Contained databases have no dependencies on server-level metadata and settings.
How to Configure ?
Using SQL Server Management studio
- Right-click on the Server Name
- Click “Properties” to bring the properties window
- “Advanced”, the field “Enable Contained Databases”
- Select “True” and press Ok to save and close the properties window.
Using TSQL :Open a new query window and execute the below script.
sp_configure 'show advanced options',1

GO

RECONFIGURE WITH OVERRIDE

GO

sp_configure 'contained database authentication', 1

GO

RECONFUIGRE WITH OVERRIDE

GO
After executing the script, the messages window should look like this
Configuration option 'show advanced options' changed from 0 to 1. Run the RECONFIGURE statement to install. Configuration option 'contained database authentication' changed from 1 to 1. Run the RECONFIGURE statement to install
Creating a new contained database
To create a new database as a contained database, we have to make containment type as Partial in the Options page.If we script out the create database, we can find out the query to create it using t-SQL as below:

CREATE DATABASE [TestContainedDB]

 CONTAINMENT = PARTIAL

 ON  PRIMARY

( NAME = N'TestContainedDB', FILENAME = N'D:\Database\TestContainedDB.mdf' ,

 SIZE = 5120KB , FILEGROWTH = 1024KB )

 LOG ON

( NAME = N'TestContainedDB_log', FILENAME = N'D:\Database\TestContainedDB_log.ldf' ,

SIZE = 2048KB , FILEGROWTH = 10%)

GO
Once the database is created, we can verify it using the sys.databases:
Select containment,name from sys.databases where name='TestContainedDB‘
If the containment is not enabled in the databases, it will return 0, else 1, so in our case it should return 1.To get the list of all contained database :
SELECT name as 'Database Name', case containment

when 1 then 'YES' else 'NO'

end as 'Is Contained?'

FROM master.sys.databases

WHERE containment <> 0;

GO
How to Make Connection ?
Expand contained databases
- Go to Security
- Create New database user and
- Create new user type as SQL user with password and provide default schema dbo
- Assign owned Schemas db_owner
Using T-SQL
USE [TestContainedDB]
GO
CREATE USER [TestUser] WITH PASSWORD=N’test’, DEFAULT_SCHEMA=[dbo]
Go
Connects to Contain Database
Normally, to connect with SQL database instance we used to provide instance name, authentication method (windows\SQL) and, if SQL, username and password.To contained database we also need to specify contained DB name in the connection parameter.
Differences between database connections and sessions?
Connection
Connection represents connection to the server over a network or locally through shared memory . A connection may be linked with zero or more then one session. Dynamic management view provides information about connections established to the Database Engine instance :
Select * from sys.dm_exec_connections
There are also connections for non Tabular Data Stream (TDS) purpose sys.dm_db_mirroring_connections or Service Broker connections sys.dm_broker_connections.
Session
The session in SQL Server is a semi-permanent container of state for an information exchange. In other words the sessions stores settings like cache of your login information, current transaction isolation level, session level SET values etc etc.
Select * from sys.dm_exec_sessions
How to Encrypt SQL TDS connections ?
The certificate must be issued for Server Authentication. The name of the certificate must be the fully qualified domain name (FQDN) of the computer. Certificates are stored locally for the users on the computer. To install a certificate for use by SQL Server, you must be running SQL Server Configuration Manager with an account that has local administrator privileges.
The client must be able to verify the ownership of the certificate used by the server. If the client has the public key certificate of the certification authority that signed the server certificate, no further configuration is necessary. Microsoft Windows includes the public key certificates of many certification authorities. If the server certificate was signed by a public or private certification authority for which the client does not have the public key certificate, you must install the public key certificate of the certification authority that signed the server certificate.
It’s important to encrypt the tabular data stream (TDS) channel with SSL. First, you will need a valid certificate. It must be issued by a trusted third party and the FQDN on it must exactly match the name of the SQL Server. To make your life easier, don’t trick with DNS aliases and DNS suffixes.
To provision (install) a certificate on the server :
- On the Start menu, click Run, and in the Open box, type MMC and click OK.
- In the MMC console, on the File menu, click Add/Remove Snap-in.
- In the Add/Remove Snap-in dialog box, click Add.
- In the Add Standalone Snap-in dialog box, click Certificates, click Add.
- In the Certificates snap-in dialog box, click Computer account, and then click Finish.
- In the Add Standalone Snap-in dialog box, click Close.
- In the Add/Remove Snap-in dialog box, click OK.
- In the Certificates snap-in, expand Certificates, expand Personal, and then right-click Certificates, point to All Tasks, and then click Import.
- Right-click the imported certificate, point to All Tasks, and then click Manage Private Keys. In the Security dialog box, add read permission for the user account used by the SQL Server service account.
Complete the Certificate Import Wizard, to add a certificate to the computer, and close the MMC console. For more information about adding a certificate to a computer, see your Windows documentation