Step by Step Table Partition in SQL Server 2014
Step by Step Table Partition in SQL Server 2014
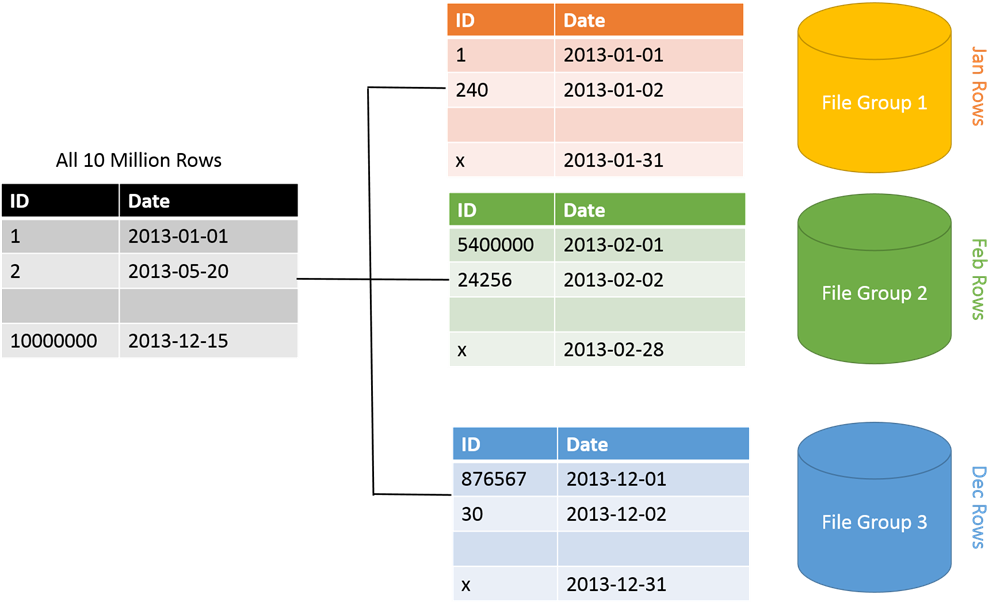
What is Table Partition ? ¢ Partitioning is the database process or method where very large tables and indexes are divided in multiple smaller and manageable parts. SQL Server allows to partition tables using defined ranges and also provides management features and tools to keep partition tables in optimal performance.
How Table is Partitioned ?
¢ The data of partitioned tables and indexes is divided into units that can be spread across more than one filegroup in a database. The data is partitioned horizontally, so that groups of rows are mapped into individual partitions. The table or index is treated as a single logical entity when queries or updates are performed on the data. All partitions of a single index or table must reside in the same database.
When Table Partition is Required?
Generally, a large table might be appropriate for partitioning if both of the following are true: 1. The table contains, or is expected to contain, lots of data that are used in different ways. 2. partitioning a table or index might improve query performance if the partitions are designed correctly, based on the types of queries you frequently run and on your hardware configuration. 3. Queries or updates against the table are not performing as intended, or maintenance costs exceed predefined maintenance periods.
When Partition is not required
While partitioning can offer great benefits, it adds administrative overhead and complexity to the implementation of your objects, which can be more of a burden than a gain. Specifically, you might not want to partition a small table, or a table that currently meets performance and maintenance requirements.Partitioning to relieve the burden of moving rows and data—you should consider whether your scenario has this sort of burden when deciding whether to implement partitioning
Steps For Table Partition
Step 1 : Create New Test Database with two different filegroups I have written tutorial using my C: Drive, however to take advantage of partition it is recommended that different file groups are created on separate hard disk to get maximum performance advantage of partitioning. Before running following script, make sure C: drive contains two folders – Primary and Secondary as following example has used those two folder to store different filegroups. USE Master; GO — Step 1 : Create New Test Database with two different filegroups. IF EXISTS ( SELECT name FROM sys.databases WHERE name = N’TestDB’) DROP DATABASE TestDB; GO CREATE DATABASE TestDB ON PRIMARY (NAME=’TestDB_Part1’, FILENAME= ‘C:\Data\Primary\TestDB_Part1.mdf’, SIZE=2, MAXSIZE=100, FILEGROWTH=1 ), FILEGROUP TestDB_Part2 (NAME = ‘TestDB_Part2’, FILENAME = ‘C:\Data\Secondary\TestDB_Part2.ndf’, SIZE = 2, MAXSIZE=100, FILEGROWTH=1 ); GO Partition Function defines the range of values to be stored on different partition. For our example let us assume that first 10 records are stored in one filegroup and rest are stored in different filegroup. Following function will create partition function with range specified. USE TestDB; GO
— Step 2 : Create Partition Range Function CREATE PARTITION FUNCTION TestDB_PartitionRange (INT) AS RANGE LEFT FOR VALUES (10); GO
Step 4 : Create Table with Partition Key and Partition Scheme The table which is to be partitioned has to be created specifying column name to be used with partition scheme to partition tables in different filegroups. Following example demonstrates ID column as the Partition Key. USE TestDB; GO
— Step 4 : Create Table with Partition Key and Partition Scheme CREATE TABLE TestTable (ID INT NOT NULL, Date DATETIME) ON TestDB_PartitionScheme (ID); GO
– Step 5 : (Optional/Recommended) Create Index on Partitioned Table
This step is optional but highly recommended. Following example demonstrates the creation of table aligned index. Here index is created using same Partition Scheme and Partition Key as Partitioned Table. USE TestDB; GO
— (Optional/Recommended) Create Index on Partitioned Table CREATE UNIQUE CLUSTERED INDEX IX_TestTable ON TestTable(ID) ON TestDB_PartitionScheme (ID); GO
Step 6 : Insert Data in Partitioned Table
Insert data in the partition table. Here we are inserting total of 3 records. We have decided that in table partition 1 Partition Key ID will contain records from 1 to 10 and partition 2 will contain reset of the records. In following example record with ID equals to 1 will be inserted in partition 1 and rest will be inserted in partition 2.
USE TestDB; GO — Step 6 : Insert Data in Partitioned Table INSERT INTO TestTable (ID, Date) – Inserted in Partition 1 VALUES (1,GETDATE()); INSERT INTO TestTable (ID, Date) – Inserted in Partition 2 VALUES (11,GETDATE()); INSERT INTO TestTable (ID, Date) – Inserted in Partition 2 VALUES (12,GETDATE()); GO Step 7 : Test Data from TestTable Query TestTable and see the values inserted in TestTable. USE TestDB; GO
— Step 7 : Test Data from TestTable SELECT * FROM TestTable; GO Step 8 : Verify Rows Inserted in Partitions We can query sys.partitions view and verify that TestTable contains two partitions and as per Step 6 one record is inserted in partition 1 and two records are inserted in partition 2. USE TestDB; GO — Step 8 : Verify Rows Inserted in Partitions SELECT * FROM sys.partitions WHERE OBJECT_NAME(OBJECT_ID)=’TestTable’; GO