Installing Microsoft SQL Server 2012 on Windows 2012 Server
Prerequisite
<div class="MsoListParagraphCxSpFirst" style="margin:0 0 0 .5in;text-indent:-.25in;">1. OS:</div><div class="MsoListParagraphCxSpMiddle" style="margin:0 0 0 .5in;">Windows 7, Windows Server 2008 R2, Windows Server 2008 Service Pack 2, </div><div class="MsoListParagraphCxSpMiddle" style="margin:0 0 0 .5in;">Windows Vista Service Pack 2.</div><div class="MsoListParagraphCxSpMiddle" style="margin:0 0 0 .5in;text-indent:-.25in;">2. .NET 3.5 SP1 is a requirement</div><div class="MsoListParagraphCxSpMiddle" style="margin:0 0 0 .5in;text-indent:-.25in;">3. Install.NET 3.5 SP1 before</div><div class="MsoListParagraphCxSpMiddle" style="margin:0 0 0 .5in;text-indent:-.25in;">4. Enable .NET Framework 3.5 (If OS Windows Server 2008 R2 SP1)</div><div class="MsoListParagraphCxSpMiddle" style="margin:0 0 0 .5in;text-indent:-.25in;">5. Processor:</div><div class="MsoListParagraphCxSpMiddle" style="margin:0 0 13.5pt .5in;text-align:left;"> 32-bit systems –Intel or compatible 1GHz or more </div><div class="MsoListParagraphCxSpMiddle" style="margin:0 0 13.5pt .5in;text-align:left;"> 64-bit systems – 1.4 GHz or more</div><div class="MsoListParagraphCxSpMiddle" style="margin:0 0 13.5pt .5in;text-indent:-.25in;">6. Memory requirements : 1 GB or More</div><div class="MsoListParagraphCxSpMiddle" style="margin:0 0 13.5pt .5in;text-indent:-.25in;">7. Hard Disk Space : 2.2 GB of available </div><div class="MsoListParagraphCxSpLast" style="margin:0 0 10pt .5in;">For detail see: Hardware and Software Requirements for Installing SQL Server 2012 </div><div class="MsoNormal" style="margin:0 0 10pt;"> Download Link: Microsoft® SQL Server® 2012 Evaluation</div><div class="MsoNormal" style="margin:0 0 10pt;">Procedure:</div><div class="MsoNormal" style="margin:0 0 10pt;">Follow the below steps:</div><div class="MsoListParagraph" style="margin:0 0 13.5pt .5in;text-indent:-.25in;">1. Insert SQL Server 2012 installation media into your DVD drive/virtual disc drive. Installation process prompted with AutoPlay dialog as shown in the image below:</div><div class="separator" style="clear:both;text-align:center;">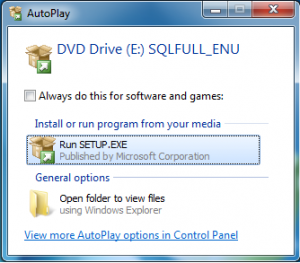 </div>
Now SQL Server 2012 install will start displaying the background processesas
following dialog.
<div class="separator" style="clear:both;text-align:center;">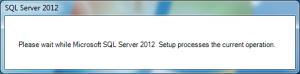 </div><div class="separator" style="clear:both;text-align:center;">
</div><div class="MsoListParagraphCxSpFirst" style="margin:0 0 0 .5in;text-indent:-.25in;">2. After that SQL Server Installation Center will be visible. Then click on “Installation” from left site and “New SQL Server stand-alone installation or add features to an existing installation” from right.</div><div class="separator" style="clear:both;text-align:center;"> </div>
<div class="MsoListParagraphCxSpMiddle" style="margin:0 0 0 .5in;text-indent:-.25in;">3. Once you click, you should see “Setup Support Rules” screen. Click OK when the setup support rules have succeeded. Enter your product key and click Next </div>
<div class="separator" style="clear:both;text-align:center;">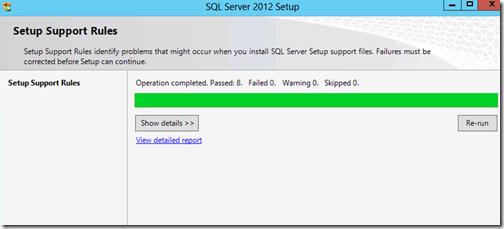 </div>
<div class="MsoListParagraphCxSpFirst" style="margin:0 0 0 .5in;text-indent:-.25in;">4. Then “Product Key” Screen will be appearing. Select Evaluation or enter Product Key. And Click on Next Button.Accept SQL Server 2012 license terms and conditions Click Next.
</div><div class="separator" style="clear:both;text-align:center;">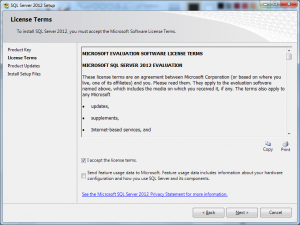 </div>
<div class="MsoListParagraphCxSpMiddle" style="margin:0 0 13.5pt .5in;text-indent:-.25in;">5. In the next screen, SQL Server 2012 install wizard will ask you to install setup files needed. Click on ‘Install’ button. </div><div class="separator" style="clear:both;text-align:center;">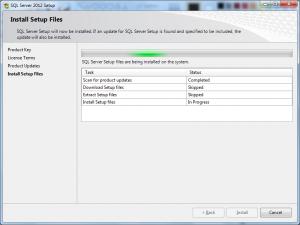 </div> 6. Once the setup files are installed then install complete screen will appear.
<div class="separator" style="clear:both;text-align:center;"> </div>
7. Selected ‘SQL Server Feature Installation’ and click Next to continue
<div class="separator" style="clear:both;text-align:center;">
</div><div class="separator" style="clear:both;text-align:center;">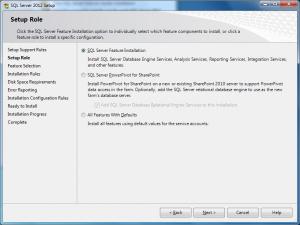 </div>
8. Look on ‘Feature Selection’ screen. I recommend you to click on‘Select All’. At this point, the wizard will again check your system for any blocking issues After successful completion click ‘Next’
<div class="MsoListParagraphCxSpMiddle" style="margin:0 0 0 .5in;"><div class="separator" style="clear:both;text-align:center;">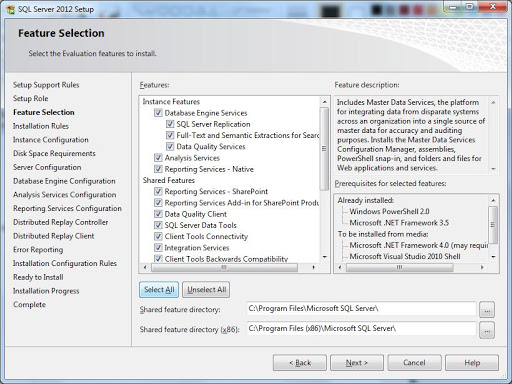 </div>
9. Whenever you are going to install first time select default instance .Click ‘Next’ to continue.</div><div class="separator" style="clear:both;text-align:center;"> </div>
10. System inform about check required disk space and view details summary. Click Next.
<div class="separator" style="clear:both;text-align:center;"> </div>
<div class="MsoListParagraphCxSpLast" style="margin:0 0 10pt .5in;text-indent:-.25in;">11. SQL Server 2012 provides option to set specific or independent service accounts for running various SQL Server services. </div><div class="separator" style="clear:both;text-align:center;">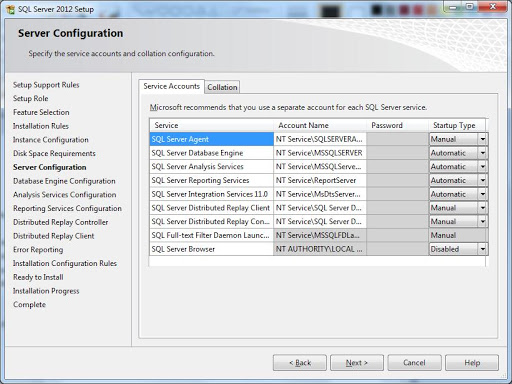 </div>
<div class="MsoListParagraphCxSpFirst" style="margin:0 0 0 .5in;text-indent:-.25in;">12. Leave default selections as-is Click Next to continue.
</div><div class="separator" style="clear:both;text-align:center;"> </div>
13. Now you can select either windows authentication mode or mixed mode. Windows authentication mode lets you add only windows users while mixed mode lets you create users with a unique login and password.
<div class="separator" style="clear:both;text-align:center;">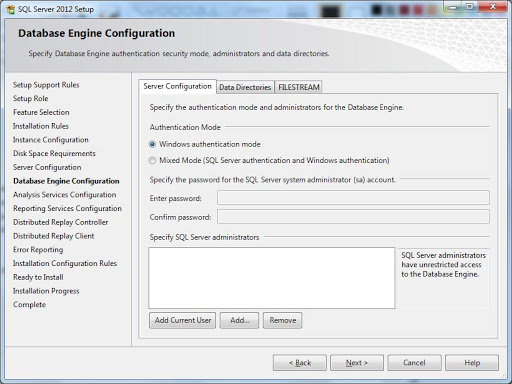 </div>
<div class="separator" style="clear:both;text-align:center;"> </div>
14. You may select default option. Click Next to continue.
<div class="separator" style="clear:both;text-align:center;">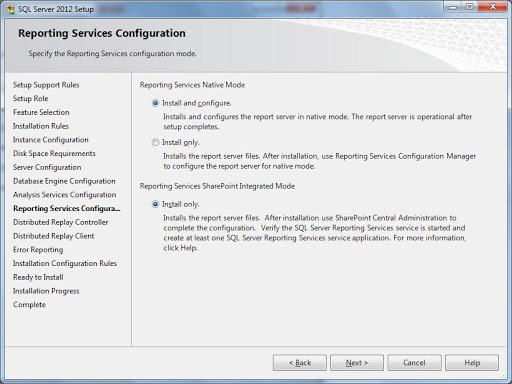 </div>
15. Add Current User as an administrator account. Then Click Next
<div class="separator" style="clear:both;text-align:center;"> </div>
16.Leave the Controller Name blank and Click Next to continue (see image below).
<div class="separator" style="clear:both;text-align:center;">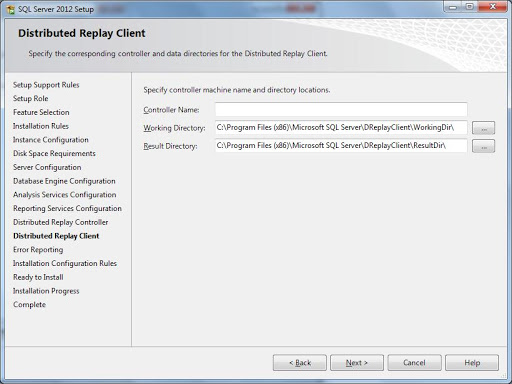 </div>
17. Select check box if you would like to send error reports to Microsoft.
<div class="separator" style="clear:both;text-align:center;">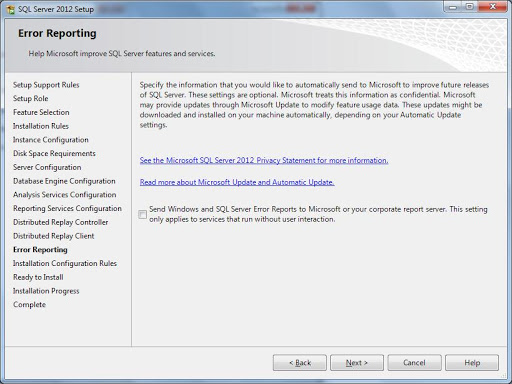 </div>
18. System verifies your system for any potential blocking issues. Once the operation is completed, click Next to continue
<div class="separator" style="clear:both;text-align:center;"> </div>
19. In this option system view which configuration file will be used for installation .Click install for installation
<div class="separator" style="clear:both;text-align:center;">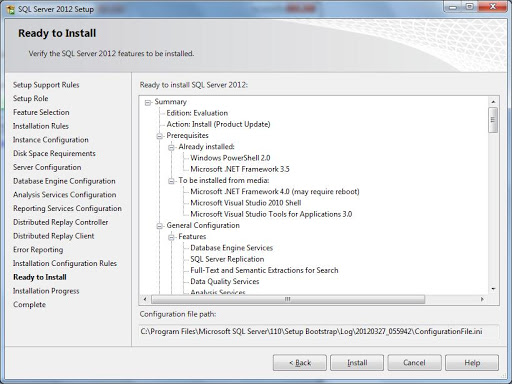 </div>
20. After clicking on install button system will start to install.
<div class="separator" style="clear:both;text-align:center;"> </div><div class="separator" style="clear:both;text-align:center;">
</div><div class="separator" style="clear:both;text-align:center;">21. Installer will take a while in this step before the installation is complete.</div><div class="separator" style="clear:both;text-align:center;">
</div>
<div class="separator" style="clear:both;text-align:center;">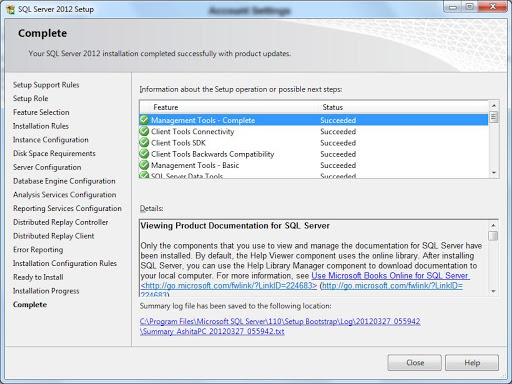 </div>
<div class="MsoListParagraph" style="margin:0 0 10pt .5in;text-indent:-.25in;">22. After installation completion a screen will appear to make update that the installation was successful. You can launch SQL Management Studio to confirm a successful installation.
 </div>