Installation SharePoint 2013 Step by Step
Prerequsit
Wnidows Server 2008 R2 64bit with service pack or Wnidows Server 2012
SQL Server 2008R2 or SQL Server 2012
Windows Identity Foundation v1.1
Microsoft Information Protection and Control Client
Microsoft WCF Data Services
Windows Management Framework 3.0
Application Server Role
Web Server (IIS) Role
Microsoft .NET Framework 4.0
Update for the .NET Framework 4 (KB2468871)
Microsoft SQL Server 2008 Native Client
Windows Identity Foundation (KB974405)
Microsoft Sync Framework Runtime v1.0 (x64)
Windows Server AppFabric
Download Location:
http://sharepoint.microsoft.com/en-us/preview/default.aspx
Steps :
1. Download and unzip the files ISO file the SPS 2013 setup
<div class="MsoNormal" style="line-height:normal;margin:0 0 10pt;">2. Way to install Prerequsit: Run the setup file and you will get a link ‘Install Software Prerequisites ‘.Or you can click on Prerequsit icon within ISO file </div><div class="separator" style="clear:both;text-align:center;"> </div><div class="MsoNormal" style="line-height:normal;margin:0 0 10pt;">3. Server will be restarted at the time of prerequisites installation . After intallation</div><div class="MsoNormal" style="line-height:normal;margin:0 0 10pt;"> you will view below screen and click Finish.</div><div class="separator" style="clear:both;text-align:center;">
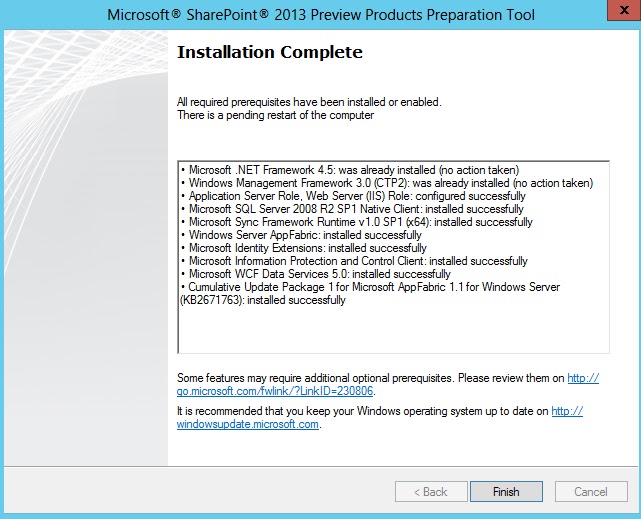 </div><div class="MsoNormal" style="line-height:normal;margin:0 0 10pt;">
4. After prerequisites installation start the setup file again and Click on the ‘install SharePoint Server’ .</div><div class="separator" style="clear:both;text-align:center;"></div><div class="MsoNormal" style="line-height:normal;margin:0 0 10pt;">
4. After that ‘Enter your Product Key ‘ option will appear and click on Continue. </div>
<div class="separator" style="clear:both;text-align:center;"> 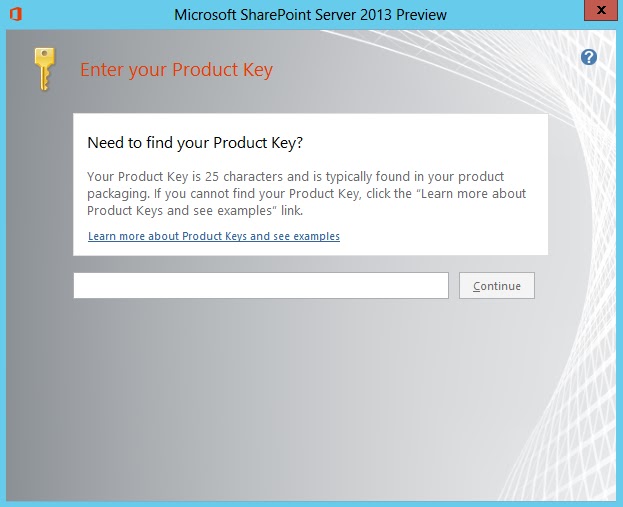 </div><div class="separator" style="clear:both;text-align:center;">
</div><div class="separator" style="clear:both;text-align:left;">5. Now click on the check box to Accept Terms of agreement and click continue to move on the next screen </div><div class="separator" style="clear:both;text-align:center;">
</div>
<div class="separator" style="clear:both;text-align:center;">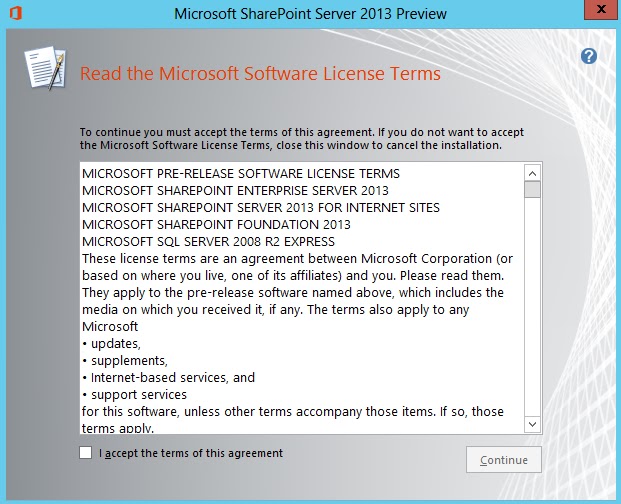 </div><div class="separator" style="clear:both;text-align:left;">
</div><div class="MsoNormal" style="line-height:normal;margin:0 0 10pt;">6. Installation server type will be appear to you ,now have to chose one between installing either Completely or Stand-Alone. Select one of the types and click on Install Now. </div><div class="separator" style="clear:both;text-align:center;"> </div><div class="separator" style="clear:both;text-align:center;">
</div>7. Once the installation is complete, you can choose to run the Configuration Wizard as shown below. Now you Configuration Wizard screen will appaear, click Close to continue.
<div class="separator" style="clear:both;text-align:center;">
</div><div class="separator" style="clear:both;text-align:center;">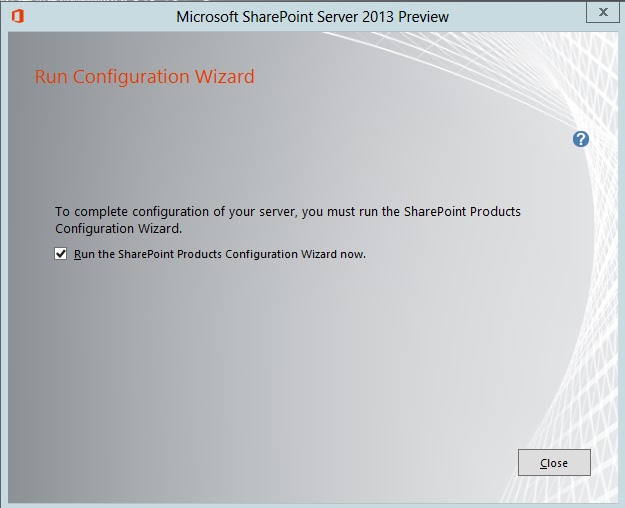 </div><div class="separator" style="clear:both;text-align:center;">
</div><div class="separator" style="clear:both;text-align:left;"> 8. Now welcome screen will be appear click next to continue</div><div class="separator" style="clear:both;text-align:center;"> </div><div align="left" class="separator" style="clear:both;text-align:center;"></div><div class="separator" style="clear:both;text-align:left;">
</div>9. After that an warning message may be viewable that make you update that at time of configuration listed service will restart or not.
<div class="separator" style="clear:both;text-align:left;">
</div><div class="separator" style="clear:both;text-align:center;"> </div><div class="separator" style="clear:both;text-align:left;">
</div>10. If you already have any server farm then click ‘Connect to an existing server farm’ or click on ‘Create a new server farm’
<div align="left" class="separator" style="clear:both;text-align:center;"></div><div class="MsoNormal" style="line-height:normal;margin:0 0 10pt;"></div><div class="separator" style="clear:both;text-align:center;"> </div><div class="separator" style="clear:both;text-align:center;">
</div>
<div class="MsoNormal" style="line-height:normal;margin:0 0 10pt;">11.Specify your configuration database settings and enter the DOMAIN\sp_farm account credentials.</div><div class="separator" style="clear:both;text-align:center;">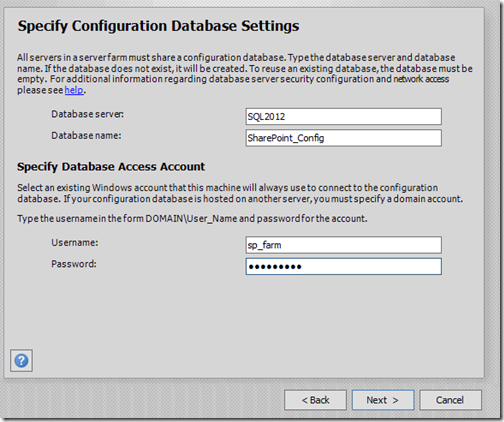 </div><div class="MsoNormal" style="line-height:normal;margin:0 0 10pt;"></div><div class="MsoNormal" style="line-height:normal;margin:0 0 10pt;">12 Specify the Farm Passphrase which was first introduced in SharePoint 2010. This passphrase is important and will be required for future installs of SharePoint 2013 when configured in the same farm.</div><div class="separator" style="clear:both;text-align:center;">
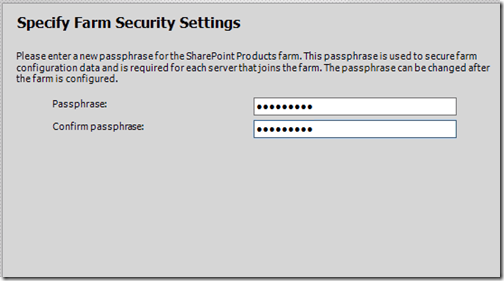 </div><div class="MsoNormal" style="line-height:normal;margin:0 0 10pt;"></div><div class="MsoNormal" style="line-height:normal;margin:0 0 10pt;">13 Here I like to specify an alternate more memorable port number.
<div class="separator" style="clear:both;text-align:center;"> </div><div class="separator" style="clear:both;text-align:center;">
</div>14. Now Click on next
<div class="separator" style="clear:both;text-align:center;"> </div><div class="separator" style="clear:both;text-align:center;">
</div><div class="separator" style="clear:both;text-align:left;">15. Now this is were I ran into an issue. The configuration process began and it failed at step 3</div>
<div class="separator" style="clear:both;text-align:center;"> </div><div class="separator" style="clear:both;text-align:center;">
</div>Now this error indicate SQL Server instance does not have the required ”max degree of parrallelism” setting of 1. We need to run the following script on our SQL 2012 server.
<pre> sp_configure ‘show advanced options’, 1;
GO
RECONFIGURE WITH OVERRIDE;
GO
sp_configure ‘max degree of parallelism’, 1;
GO
RECONFIGURE WITH OVERRIDE;
GO</pre>
It’s an important issue that SQL under databases that the SharePoint_Config database had been created. We need to delete the SharePoint_Config DB otherwise we would have to specify a new name when re-running the SharePoint Configuration Wizard.
<div style="text-align:left;">After deleting the SharePoint_Config DB, re-run the SharePoint configuration Wizard.</div></div>
<div class="separator" style="clear:both;text-align:center;"> </div><div class="separator" style="clear:both;text-align:center;">
</div><div class="separator" style="clear:both;text-align:left;">16. This time is should go right through to the end without any errors and you will finally be greeted with the below successful screen.</div><div class="separator" style="clear:both;text-align:left;">
</div><div class="separator" style="clear:both;text-align:left;"></div><div class="separator" style="clear:both;text-align:center;"> </div><div class="separator" style="clear:both;text-align:center;">
</div>
<div class="separator" style="clear:both;text-align:left;">17. Central Administration will launch automatically and you will be greeted with the Initial Farm Configuration page.</div><div class="separator" style="clear:both;text-align:center;"> </div><div class="separator" style="clear:both;text-align:center;">
</div><div class="separator" style="clear:both;text-align:left;">18. Now you can have option to start the wizard to configure the service applications or click cancel. For configuring the service applications separately in future articles click cancle .</div>
<div class="separator" style="clear:both;text-align:center;"> </div>
<div class="separator" style="clear:both;text-align:left;">19. Finally now we go to Central Administration :</div><div class="separator" style="clear:both;text-align:left;">
</div><div class="separator" style="clear:both;text-align:center;"> </div><div class="separator" style="clear:both;text-align:left;">
</div>